



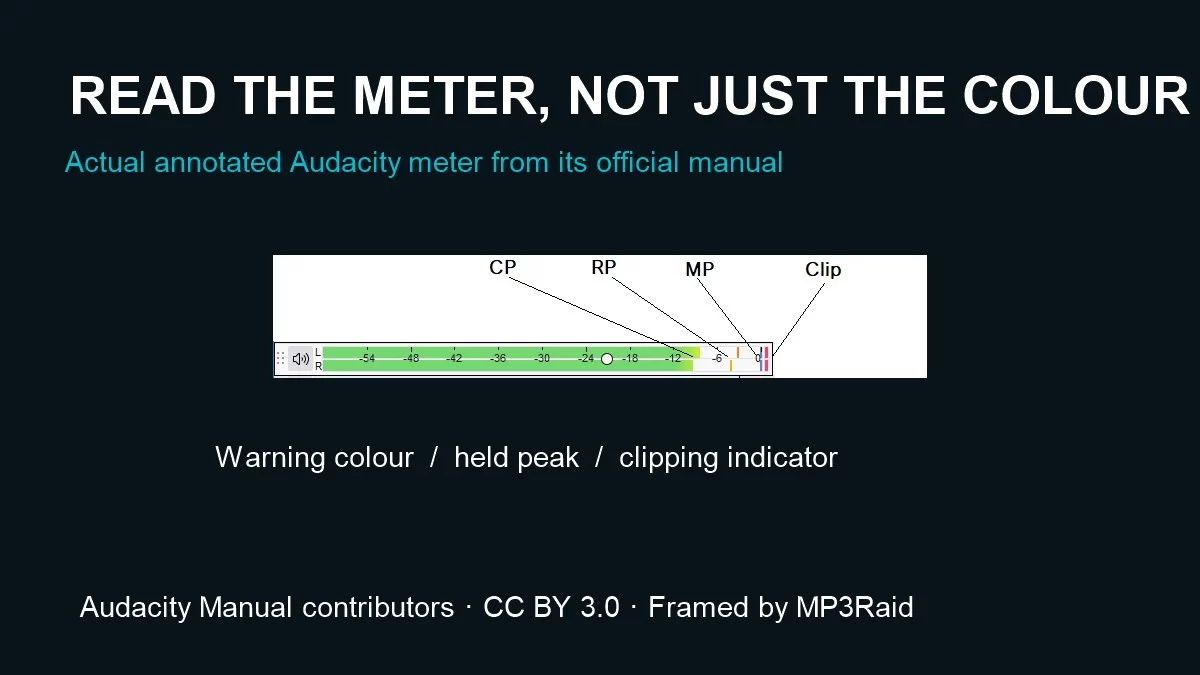
A meter can stay marked red after the loud passage is over. Or its moving bar can enter a red region before the signal reaches zero. Which one are you seeing? That is worth checking before changing the mix: the first may be a record of an earlier event, while the second may be a warning about the level approaching the top of the scale.
Audacity and Adobe Audition provide useful examples in their official manuals. This is a source-based guide to those documented displays, not a claim that every editor uses the same colours or that a file has been tested by MP3Raid. Keep the selected meter style and software version beside any screenshot you use as a reference.
A red bar can leave some room above it
Adobe’s level-meter documentation identifies its scale as dBFS, relative to digital full scale. It describes zero as the maximum amplitude before clipping. In the non-gradient colour setting, the bars turn yellow at minus 18 dBFS and red at minus 6. The clip indicator is a separate part of the display.
So a red bar at minus 6 is not the same report as an illuminated clipping flag. It warns before the top of that scale. The colour tells you less on its own than the colour together with the number and the indicator being used.
The Audacity Meter Toolbars manual makes a similar distinction. Its recording bars move towards red above minus 6 as they approach zero. It also offers different meter styles. A screenshot using another style may show a different colour scheme, so check the selected style before comparing the bars.
Was it happening now, or earlier?
Audacity distinguishes the current peak, a recent peak and a maximum peak. Its documented clipping bars can remain after the troublesome moment has passed. Seeing one during a quiet passage therefore does not locate the problem in that passage.
Adobe likewise allows dynamic or static peak displays, with different behaviour for retained peaks. Its documentation explains how to reset indicators. Before resetting anything, note the position and the passage you were playing. Clearing a marker clears the display history; it does not repair audio.
If you need to locate clipping in Audacity, the manual points to Show Clipping in Waveform and Find Clipping. A whole-session warning is a reason to investigate the signal, rather than proof that every second needs the same correction.
Check where the meter sits
An individual track and the combined output answer different questions. Adobe says its multitrack meters show individual track amplitudes, while the Levels panel shows the mix output. Audacity’s playback meter reflects the combined project signal. A modest reading on one track cannot settle what the summed output is doing.
There is also a trap in reaching for the listening-volume control. Audacity says its playback slider changes the volume sent to speakers without changing the project audio’s amplitude. Making playback quieter that way does not establish that the exported mix has changed. Check the relevant project gain and output meter if export level is the issue.
A short diagnosis before another export
- Identify the input, track or output being metered.
- Read the scale and separate the moving bar from any retained marker.
- Note the passage, then reset the indicator as documented and replay it.
- Check the affected signal again after a deliberate gain change, before exporting.
Our ReplayGain and normalization guide covers another distinction between a listening-level adjustment and the underlying audio. Here the immediate task is to find out what the meter reports. A warning colour can help you notice a rising level; the documented clip indicator and its history tell you which question to investigate next.